As an Amazon Associate, I earn from qualifying purchases

Hello everyone, welcome back to our blog – your ultimate guide for all things instant pot delay start related. Today we’re dissecting and putting into practice one of the most useful yet underleveraged features of an Instant Pot – the ‘Delay Start’. If you’re someone consistently clashing schedules with your cooking time or wishing for your meals to magically appear just when you need them, this segment is carved explicitly for you!
Join us today, as we navigate the ‘Delay Start’ path, equipping you with the knowledge to ace this art, ensuring you step into a kitchen aromatic with delicious ready-to-eat meals, no matter your itinerary!
Unpacking the ‘Delay Start’ Function
Also known as the ‘Timer’ function on some models, the ‘Delay Start’ function in an Instant Pot lets you program the cooker to start after a certain amount of time. It’s the epitome of convenience.
- You can set the cooker to start anywhere from a few minutes to 24 hours later.
- It’s perfect for ticking off chores while your meal cooks up, or coming home to a ready-to-eat dinner after a hard day.
- Understand, though, that using the Delay Start function won’t include active cooking time or the time needed for the Instant Pot to pressurize.
What is Instant Pot Delay Start / Timer?
The ‘Delay Start’ or ‘Timer’ is a feature that allows you to pre-program your Instant Pot to start cooking at a specific time. With this function, you can prepare your recipe, add it to the pot, and then set a delay timer for the Instant Pot to start cooking. This means that you can pour in your ingredients in the morning and have your meal start cooking so it’s ready when you come back from work in the evening. Essentially, it’s like having a cooking assistant who begins the cooking process for you as per your convenience.
- This function can prove quite handy for recipes that require long cooking times, such as slow-cooking recipes.
- Feedback from users who frequently use delay start suggests that careful use of this function can improve the taste and consistency of certain dishes by allowing flavors to marinate before the cooking process begins.
- It’s particularly beneficial in case of busy workdays, hosting parties, or wishing for a warm meal as soon as you’re back at home.
However, bear in mind some limitations with the ‘Delay Start’ function.
Why Would you Use Delay Start?
The ‘Delay Start’ function can prove especially beneficial for those with busy schedules, providing you with freshly cooked meals no matter what you require. Reasons to use this function include:
- Automation of meal prepping: If you have your meals planned and often find it difficult to allocate enough time to prepare your meals on time, the ‘Delay Start’ function can be an absolute lifesaver.
- Efficient time management: By anticipating when you will be ready for your next meal, ‘Delay Start’ lets you work, rest, or fulfill other commitments without worrying about operating your Instant Pot manually.
- Improved flavors: Particularly for recipes that develop and intensify flavors over time, starting the cooking process later can lead to a delicious end product.
- Perfect for celebrations and gatherings: dinner parties, family gatherings, or game nights, the ‘Delay Start’ function comes to your rescue by taking care of cooking while you focus on other preparations.
Keep in mind, however, that certain foods may not be suitable for setting up several hours in advance due to safety concerns. Raw meats, dairy, or other perishable foods are recommended to not be left out at room temperature for more than a few hours.
Make sure you use the ‘Delay Start’ feature judiciously depending on what you intend to cook.
Is Delay Start Safe to Use?
The ‘Delay Start’ function is safe to use, and, indeed, one of the features that make the Instant Pot such a versatile and user-friendly appliance. There are, however, a few guidances to follow to ensure food safety while using this feature:
- Non-perishable ingredients like grains, spices, and certain vegetables can safely sit in the Instant Pot with ‘Delay Start’ engaged.
- Do not put perishable foods like dairy or meat products in the Instant Pot in ‘Delay Start’ mode for more than a few hours.
- An alternative for perishable ingredients could be freezing them beforehand which gives them time to thaw before the cooking begins.
- Always ensure to use the appropriate amount of liquids as advised in the recipe when using ‘Delay Start’ to avoid any potential scorching.
- Occasionally, factors such as high altitude or power outage may interrupt ‘Delay Start.’ Always inspect food for signs of spoilage if ‘Delay Start’ doesn’t function as expected.
Do remember that while ‘Delay Start’ offers remarkable versatility and convenience, it ought to be used responsibly while considering food safety expertise for the best outcomes.
How to Use Delay Start on Your Instant Pot?
Taking you through the practical aspect of it all, here’s how to set up the ‘Delay Start’ on your Instant Pot:
Plug in your Instant Pot and ensure it’s on a flat, sturdy surface. Add all of your desired ingredients into the pot. Secure the lid of the Instant Pot ensuring the sealing ring is correctly in place and set to sealing mode.
Press the ‘Delay Start’ or ‘Timer’ button on your Instant Pot. Using the ‘+’ or ‘-‘ button, adjust to set the delay time to when you want the cooking process to begin. Remember that this is the delay before starting to cook, not the cooking duration. Press ‘Manual’ or ‘Pressure Cook’, then set the cooking time as per your recipe.
Instant Pot LUX Delay Start
Instant Pot LUX models are also equipped with the ‘Delay Start’ function. To use it on this model, simply follow these steps:
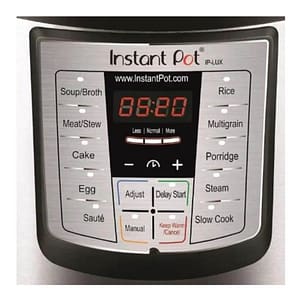
Plug in the instant pot and place it on a heat-resistant, sturdy surface. Add all required ingredients for your recipe into the pot. Make sure to tighten the ill properly prior to starting the cooker.
Then locate and press the ‘Timer’ button on the Instant Pot. The ‘+’ or ‘-‘ keys will help you stipulate the delay time prior to starting to cook. After that, press either ‘Manual’ or ‘Pressure Cook’ to set your desired cooking time.
Here are the directions for Instant Pot Lux delay start:
- Press the Soup/Broth or Manual or Pressure Cook buttons or any other button.
- To adjust the pressure cooking time, press + or –.
- Click on Delay Start. When the feature is activated, the Delay Start light is on.
- To choose the desired delay start time, such as 4:00 to begin pressure cooking in 4 hours, push + or –.
- The countdown on the display will start, say, at 4:00 and end at 0:00.
- The display will turn to “On” and pressure cooking will start when the allotted time has passed.
Instant Pot DUO Delay Start
The Instant Pot DUO series, just like the LUX series, also offers the benefits of ‘Delay Start’. The process of setting it up is much the same:
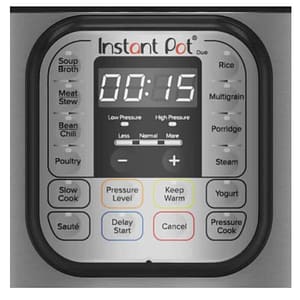
Plug in your Instant Pot DUO and fill it with all your required ingredients. Ensure the lid is secured and set to sealing.
Then, locate the ‘Timer’ or ‘Delay Start’ button on the Instant Pot and press it. Use the ‘+’ or ‘-‘ keys to set your desired delay time between when you set it and when you plan to begin cooking. After, press the ‘Manual’ or ‘Pressure Cook’ button to customize the cooking duration as per your recipe needs.
Here are the directions for Instant Pot DUO delay start:
- Press the Soup/Broth or Manual or Pressure Cook buttons or any other button.
- To adjust the pressure cooking time, press + or –.
- Click on Delay Start. When the feature is activated, the Delay Start light is on.
- To choose the desired delay start time, such as 4:00 to begin pressure cooking in 4 hours, push + or –.
- The countdown on the display will start, say, at 4:00 and end at 0:00.
- The display will turn to “On” and pressure cooking will start when the allotted time has passed.
Instant Pot DUO GOURMET Delay Start
The Instant Pot DUO GOURMET also seamlessly accommodates the ‘Delay Start’ feature. The journey to set it up remains largely the same:
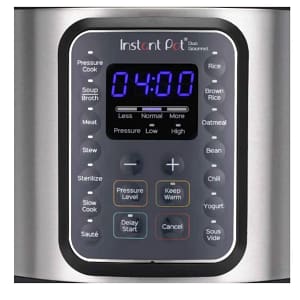
Start by plugging in your Instant Pot DUO GOURMET and loading it with the necessary ingredients for your recipe. Make sure the lid is properly secured and is set to seal.
Next, spot the ‘Timer’ or ‘Delay Start’ button on the Instant Pot and give it a press. With the ‘+’ or ‘-‘ buttons, you can dictate your desired delay time, accounting for the gap between when you initially set it and when you want the cooking to debut.
Here are the directions for the Instant Pot DUO Gourmet delay start:
- Click the Pressure Cook (or another button, such as Stew or Soup/Broth) button.
- To adjust the pressure cooking time, press + or –.
- Click on Delay Start. When the feature is activated, the Delay Start light is on.
- To choose the desired delay start time, such as 4:00 to begin pressure cooking in 4 hours, push + or –.
- The countdown on the display will start, say, at 4:00 and end at 0:00.
- The display will turn to “On” and pressure cooking will start when the allotted time has passed.
Instant Pot DUO NOVA Delay Start
The Instant Pot DUO NOVA also integrates the convenient ‘Delay Start’ function. The steps to set it up remain quite similar to the previously mentioned models:
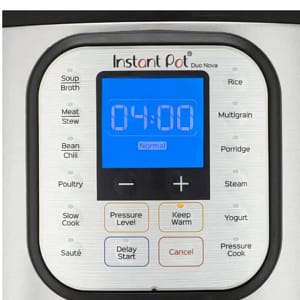
First, plug in your Instant Pot DUO NOVA and add all the required ingredients for your dish. Ensure the lid is tightly secured and the vent is set to seal position.
Next, find the ‘Timer’ or ‘Delay Start’ button on your Instant Pot and press it. Using the ‘+’ or ‘-‘ keys, determine your desired delay time – this is the time between when you set it and when you expect the cooking to begin. Afterward, press the ‘Manual’ or ‘Pressure Cook’ button and adjust the cooking duration as per your recipe requirements.
Here are the directions for Instant Pot DUO Nova delay start:
- Press the Pressure Cook button (or any other button, such as Meat/Stew or Soup/Broth).
- To adjust the pressure cooking time, press + or –.
- Click on Delay Start. When the feature is activated, the Delay Start light is on.
- To choose the desired delay start time, such as 4:00 to begin pressure cooking in 4 hours, push + or –.
- The countdown on the display will start, say, at 4:00 and end at 0:00.
- The display will turn to “On” and pressure cooking will start when the allotted time has passed.
Instant Pot DUO PLUS Delay Start
The Instant Pot DUO PLUS equally accommodates the ‘Delay Start’ option. The instructions remain similar to all other models coupled with consistent attention to detail:
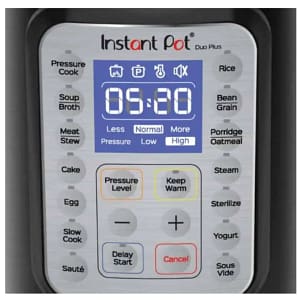
Begin by plugging in your Instant Pot DUO PLUS and incorporating all the necessary ingredients for your recipe. Confirm that the lid is properly fitted and set to sealing.
Thereafter, identify the ‘Timer’ or ‘Delay Start’ button on the Instant Pot, then press it. Use the ‘+’ or ‘-‘ buttons to set your ideal delay time – this is the gap from when you first set it up to when you expect to kick off the cooking process.
Here are the directions for the Instant Pot DUO Plus delay start:
- Press the Pressure Cook button (or any other button, such as Bean/Grain or Soup/Broth).
- To adjust the pressure cooking time, press + or –.
- Click on Delay Start. When the feature is activated, the Delay Start light is on.
- To choose the desired delay start time, such as 4:00 to begin pressure cooking in 4 hours, push + or –.
- The countdown on the display will start, say, at 4:00 and end at 0:00.
- The display will turn to “On” and pressure cooking will start when the allotted time has passed.
Instant Pot DUO EVO PLUS Delay Start
The Instant Pot DUO EVO PLUS is another model that enables the use of the ‘Delay Start’ feature. The setting up process endeavors to be as straightforward as with the other models:
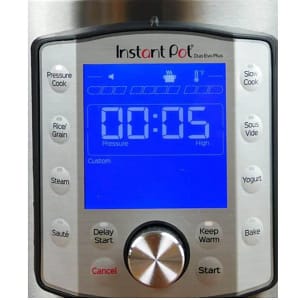
Initiate by connecting your Instant Pot DUO EVO PLUS to a power source and arranging the necessary ingredients for your dish within. Check that the lid is firmly in place and adjusted to sealing.
Then, seek out the ‘Timer’ or ‘Delay Start’ button on the Instant Pot and press it. Make use of the ‘+’ or ‘-‘ icons to determine your intended delay period – this factors in the time from when you established it until you intend the cooking to commence.
Here are the directions for the Instant Pot DUO Evo Plus delay start:
- Enable Pressure Cooking.
- To pick a chosen smart program, turn the knob in that direction and push the knob.
- To confirm, turn the knob to the specified cook time and push it.
- Click on Delay Start. When the feature is activated, the Delay Start light is on.
- Adjust the dial to the preferred delay start time, such as 4:00 to begin pressure cooking in 4 hours.
- Turn the knob to verify.
- Click “Start.”
- The countdown on the display will start, say, at 4:00 and end at 0:00.
- The display will turn to “On” and pressure cooking will start when the allotted time has passed.
Instant Pot DUO CRISP Delay Start
The Instant Pot DUO CRISP also provides the useful ‘Delay Start’ function. The guidelines to set it up are quite similar to those of the preceding models:
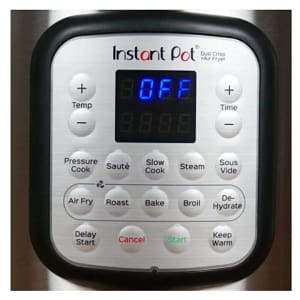
Start by connecting your Instant Pot DUO CRISP to electricity and preparing it with the necessary ingredients for your chosen recipe. Make sure that the lid is properly placed and adjusted to seal.
Next, look for the ‘Timer’ or ‘Delay Start’ button on the Instant Pot and press it. With the ‘+’ or ‘-‘ buttons, specify your chosen delay period – calculating the timespan from when you first established it to when you would like the cooking process to begin.
Here are the directions for Instant Pot DUO Crisp delay start:
- Enable Pressure Cooking.
- To select the required pressure cooking time, hit Time + or -.
- Click on Delay Start. When the feature is activated, the Delay Start light is on.
- To choose the desired delay start time, such as 4:00 to begin pressure cooking in 4 hours, push + or –.
- The countdown on the display will start, say, at 4:00 and end at 0:00.
- The display will turn to “On” and pressure cooking will start when the allotted time has passed.
Instant Pot PRO CRISP Delay Start
Similar to other models, the Instant Pot PRO CRISP also allows for the beneficial ‘Delay Start’ feature. The setup instructions are consistent with the rest of the models and demand equal precision:
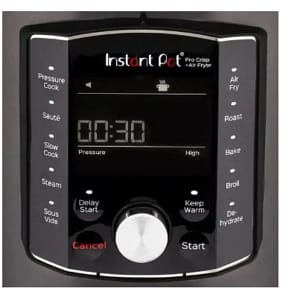
Start by plugging in your Instant Pot PRO CRISP, then input the necessary ingredients as stipulated in your recipe. Be sure that the lid is securely attached in the sealing position.
Following that, find the ‘Timer’ or ‘Delay Start’ button on the Instant Pot and press it. Using the ‘+’ or ‘-‘ buttons, set your tailored delay time – accounting for the duration from when you activate it to when you expect the cooking to begin.
Here are the directions for Instant Pot Pro Crisp delay start:
- Enable Pressure Cooking.
- To confirm, turn the knob to the specified cook time and push it.
- Click on Delay Start. When the feature is activated, the Delay Start light is on.
- Adjust the dial to the preferred delay start time, such as 4:00 to begin pressure cooking in 4 hours.
- Turn the knob to verify.
- Click “Start.”
- The countdown on the display will start, say, at 4:00 and end at 0:00.
- The display will turn to “On” and pressure cooking will start when the allotted time has passed.
Instant Pot MAX Delay Start
The Instant Pot MAX also supports the ‘Delay Start’ feature. The method to set it up is very similar to its counterparts:
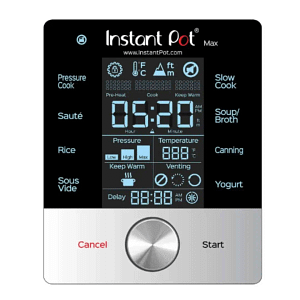
Firstly, connect your Instant Pot MAX to a power outlet and put in the necessary ingredients as per your recipe. Ensure that the lid is locked correctly and is in the sealing position.
Next, locate the ‘Timer’ or ‘Delay Start’ button on the Instant Pot and press it. Utilize the ‘+’ or ‘-‘ keys to program your optimal delay time – taking into account the interval from when you begin the setup to when you plan the cooking process to start.
Here are the directions for the Instant Pot Max delay start:
- Feel Pressure Chef.
- To set the cook time hours, touch the Hour and rotate the knob.
- To set the cook time minutes, touch the Minute and turn the knob.
- You may toggle between the default settings for Pressure, Keep Warm, and Venting by tapping each one of them repeatedly.
- Input Delay.
- To specify the time (hour) at which you want the cooking to start, touch the Delay Hour and adjust the knob. Turn the lever until the display rolls beyond 12:00 to change the AM/PM.
- To specify the time (minutes) that you want the cooking to start, touch the Delay Minute and turn the knob.
- Press the Start button.
- Besides the delayed start time, a clock symbol will have a second hand running around it.
- The display will turn to On and pressure cooking will commence as soon as the delay start time has passed.
Instant Pot ULTRA Delay Start
The Instant Pot ULTRA also offers the convenient ‘Delay Start’ feature. The procedure to initiate it is fairly parallel to previous models:

To begin with, plug your Instant Pot ULTRA into a power supply, then organize the necessary ingredients based on your intended recipe into your Instant Pot. Make sure the lid is tightly fitted and switched to sealing mode.
Next, identify the ‘Timer’ or ‘Delay Start’ button on the Instant Pot and press it. With the ‘+’ or ‘-‘ icons, you can plan your desired delay period – this takes account of the time range from when you started the setup to the time you want the cooking to start.
Here are the directions for the Instant Pot Ultra delay start:
- Set the pressure knob. Cook or use the smart program of your choice (such as Bean/Chili or Soup/Broth).
- To choose the function or program, turn the knob.
- There will be a flashing box surrounding the cooking time. Turn the knob to choose it. The time is now going to be flashing.
- To adjust the cooking time, turn the knob and push it again to make the adjustment.
- Press the knob to select the Delay option after turning it.
- Toggling between On and Off requires turning a knob. To check that On is flashing, push the knob.
- It’s going to be blinking time. Adjust the delay start time by turning the knob; for example, set it to 4:00 to begin pressure cooking in 4 hours. Turn the knob to verify.
- Click “Start.”
- The countdown on the display will start, say, at 4:00 and end at 0:00.
- The display will turn to “On” and pressure cooking will start when the allotted time has passed.
Instant Pot SMART WIFI Delay Start
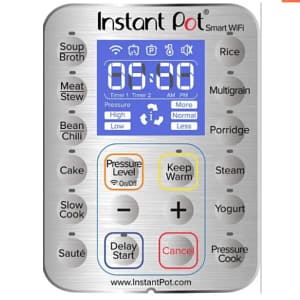
The Instant Pot SMART WIFI is suitable for those who love technology-integrated cookery. Making the best use of internet connectivity, this model allows for remote control which ensures a personalized “Delay Start” setup.
At the start, connect your Instant Pot SMART WIFI to a source of energy and your wireless network, then ready the essential ingredients following your recipe in the pot. Verify the placement and security of the lid in sealing posture.
The following step involves commanding through the Instant Pot app ‘Program logo’, then the ‘+’ sign or ‘Custom’, and thereafter ‘Delay Start’ or ‘Timer’. Slide to fix the anticipated delay – considering the phase between the setup start and the intended time for kick-starting the cooking process.
Here are the directions for Instant Pot Smart WIFI delay start:
- Press the Pressure Cook button (or any other button, such as Bean/Chili or Soup/Broth).
- To adjust the pressure cooking time, press + or –.
- Click on Delay Start. When the feature is activated, the Delay Start light is on.
- To choose the desired delay start time, such as 4:00 to begin pressure cooking in 4 hours, push + or –.
- The countdown on the display will start, say, at 4:00 and end at 0:00.
- The display will turn to “On” and pressure cooking will start when the allotted time has passed.
Conclusion
Making delayed cooking possible, the Instant Pot Delay Start feature promotes advanced meal preparation and efficient time utilization. This feature, included in a variety of models like the Max, Ultra, and Smart Wifi, greatly enhances the versatility of this multitasking kitchen appliance that can significantly up your cooking game. Understanding these straightforward instructions of the Instant Pot Delay Start points allows you to enjoy a hassle-free and time-effective culinary experience. Happy cooking!
Instant pot delay start FAQ:
The duration you can delay the start can differ based on your Instant Pot model. However, in most cases, it ranges from 0 to 24 hours.
The duration you can delay the start can differ based on your Instant Pot model. However, in most cases, it ranges from 0 to 24 hours.
The Delay Start doesn’t operate the yogurt and low-pressure modes you normally use for certain recipes.
No. Perishable foods should not be kept at room temperature for too long to avoid bacterial growth. Thus, it’s not advisable to use the Delay Start mode with meat and dairy products.
No. Once the power outage is over, you’ll need to reset your desired settings again. The Instant Pot does not automatically resume cooking after a power loss.
Leave a Reply